

Red Velvet Blossom Cookies: 7 Steps to Cookie Bliss
Oh my goodness, let me tell you about these Red Velvet Blossom Cookies! They’re not just cookies; they’re little bites of joy that bring a pop of color and sweetness to any occasion. Imagine vibrant red cookies with a soft, chewy texture that practically melt in your mouth. Seriously, they’re an absolute delight!
Every time I whip up a batch, I’m reminded of the time I baked them for a friend’s birthday party. The moment I pulled them out of the oven, the house filled with the most heavenly aroma—like a cozy hug on a chilly day! And when I brought them out to share, everyone’s faces lit up. It was a moment of pure happiness, and trust me, they disappeared in no time!
Whether you’re celebrating a special occasion or just want to treat yourself, these cookies are perfect. They’re super easy to make, and with that gorgeous color, they’ll steal the show on any dessert table. Get ready to impress your friends and family with these delightful Red Velvet Blossom Cookies—you won’t be able to stop at just one!
Ingredients List
Here’s everything you’ll need to make these scrumptious Red Velvet Blossom Cookies. Trust me, each ingredient plays a big role in creating that perfect cookie texture and flavor!
- 2 cups all-purpose flour
- 1 tablespoon cocoa powder
- 1 teaspoon baking soda
- 1/2 teaspoon salt
- 1 cup unsalted butter, softened
- 1 cup granulated sugar
- 1/2 cup packed brown sugar
- 1 large egg
- 1 tablespoon red food coloring
- 1 teaspoon vanilla extract
- 1 cup white chocolate chips
Make sure to measure everything accurately—it really does make a difference! And don’t be shy with that red food coloring; it’s what gives these cookies their stunning hue. Now, let’s get baking!
How to Prepare Red Velvet Blossom Cookies
Alright, let’s get into the fun part—making these fabulous Red Velvet Blossom Cookies! Follow these steps, and you’ll be on your way to cookie bliss in no time. Ready? Let’s do this!
Preheat and Mix Dry Ingredients
First thing’s first—preheat your oven to 350°F (175°C). This is crucial because it ensures your cookies bake evenly and achieve that perfect soft texture. While the oven is warming up, grab a bowl and mix together your dry ingredients: the flour, cocoa powder, baking soda, and salt. Mixing these well is key; it helps to evenly distribute the leavening agents, which is what makes your cookies rise beautifully. Trust me, you don’t want flat cookies!
Cream Butter and Sugars
Now, let’s cream the butter and sugars together. In another bowl, beat the softened unsalted butter, granulated sugar, and brown sugar until it’s light and fluffy—this will take about 3-5 minutes. This step is super important because it incorporates air into the mixture, making your cookies nice and airy. You’ll know it’s ready when it looks pale and fluffy—just like a cloud!
Combine Wet Ingredients
Next up, it’s time to add the fun stuff! Crack in that large egg, then pour in the red food coloring and vanilla extract. Mix it all together until it’s beautifully combined. You want to make sure that the food coloring is evenly distributed, giving you that stunning red hue throughout the dough. It’s like magic happening right in your bowl!
Blend Dry and Wet Mixtures
Now, let’s bring it all together! Gradually add the dry ingredients to your wet mixture. I like to do this in thirds—adding a little, mixing, and then adding a little more. This prevents overmixing, which can make your cookies tough instead of soft and chewy. Gently stir until everything is just combined and you don’t see any flour streaks. Oh, and don’t forget to fold in those delightful white chocolate chips at the end—they’re the cherry on top of these gorgeous cookies!
Bake the Cookies
Time to bake! Drop spoonfuls of dough onto a prepared baking sheet, spacing them out so they have room to spread. Pop them in the oven and bake for about 10-12 minutes. Keep an eye on them; you’ll know they’re done when the edges are set but the centers still look a little soft. If you can resist the temptation, let them cool on the baking sheet for a few minutes before transferring them to a wire rack. This helps them firm up just right! And oh, when you pull them out, the smell will be simply irresistible!
Tips for Success
Alright, before you dive into baking, let me share some of my favorite tips to ensure your Red Velvet Blossom Cookies come out absolutely perfect every single time!
- Use gel food coloring: For that bold, vibrant red color, I always recommend using gel food coloring instead of liquid. It gives you that eye-popping hue without watering down your dough. Trust me, it’s a game changer!
- Chill the dough: If you want thicker cookies that don’t spread too much, pop the dough in the fridge for about 30 minutes before baking. This little step makes a big difference and helps those cookies hold their shape!
- Don’t overmix: Remember, once you add the dry ingredients to the wet, mix just until combined. Overmixing can lead to tough cookies, and we definitely want soft and chewy!
- Watch your baking time: Every oven is different, so keep an eye on your cookies as they bake. They’re done when the edges are set but the centers look a bit soft. They’ll continue to firm up as they cool!
- Experiment with mix-ins: Feel free to get creative! While white chocolate chips are divine, you can also add in some chopped nuts or even dark chocolate chunks for a twist that’ll have everyone raving!
- Always cool on a wire rack: After letting them cool on the baking sheet for a few minutes, transfer those beauties to a wire rack. This prevents them from getting soggy on the bottom and keeps them nice and fresh!
With these tips in your back pocket, you’ll be well on your way to baking the most delightful Red Velvet Blossom Cookies ever! Happy baking!
Nutritional Information
Alright, let’s talk about the nutritional side of these delicious Red Velvet Blossom Cookies. It’s always nice to know what you’re indulging in, right? Here’s a breakdown of the typical values per cookie, just so you can enjoy them with a little more awareness:
- Calories: 150
- Sugar: 10g
- Fat: 7g
- Saturated Fat: 4g
- Unsaturated Fat: 2g
- Trans Fat: 0g
- Carbohydrates: 20g
- Fiber: 1g
- Protein: 1g
- Cholesterol: 30mg
Keep in mind that these values are estimates and can vary based on the specific ingredients you use. But hey, a little treat here and there is totally worth it for that soft, chewy goodness, don’t you think? Enjoy every bite guilt-free!
FAQ Section
Got questions about making these delightful Red Velvet Blossom Cookies? Don’t worry, I’ve got you covered! Here are some common queries I’ve heard, along with my tips and tricks:
Can I use different types of chocolate?
Absolutely! While I love white chocolate chips in these cookies, you can definitely switch it up. Dark chocolate chips or even semi-sweet chocolate chunks would add a lovely richness. Just remember that the flavor will change a bit, but it’ll still be delicious!
How do I store leftover cookies?
To keep your Red Velvet Blossom Cookies fresh, store them in an airtight container at room temperature. They’ll stay soft and chewy for about a week—if they last that long! If you want them to last longer, you can pop them in the fridge, but I recommend bringing them back to room temperature before enjoying.
What if I don’t have red food coloring?
No red food coloring? No problem! You can use beet powder for a natural alternative, which will give you a lovely reddish hue. Just be aware that the flavor might differ slightly, but it’s a great way to keep things natural. If all else fails, you could skip the coloring entirely and enjoy a deliciously soft cocoa cookie instead!
Can I make these cookies gluten-free?
Yes, you can! Simply substitute the all-purpose flour with a gluten-free flour blend. Just make sure it’s a blend that contains xanthan gum, which helps with texture. Your Red Velvet Blossom Cookies will still turn out delightful and chewy!
Can I freeze the cookie dough?
Absolutely! If you want to save some for later, you can freeze the cookie dough. Just scoop the dough into balls and place them on a baking sheet to freeze. Once frozen, transfer them to a zip-top bag and store for up to three months. When you’re ready to bake, just pop them directly into the oven—no need to thaw!
Why You’ll Love This Recipe
- Quick to prepare: With just a few simple steps, you can whip up a batch of these scrumptious cookies in under 30 minutes!
- Deliciously soft: The combination of butter and sugars creates a melt-in-your-mouth texture that’s simply irresistible.
- Visually appealing: The vibrant red hue makes these cookies a stunning addition to any dessert table, sure to impress your guests!
- Perfect for any occasion: Whether it’s a birthday party, holiday gathering, or just a cozy night in, these cookies fit right in.
- Fun to make: Baking these cookies is a joyful experience, especially when you see that beautiful red color come to life!
- Customizable: Feel free to mix in different chocolates or nuts to make them your own—there’s no wrong way to enjoy these cookies!
- Crowd-pleaser: Trust me, everyone will be asking for the recipe once they take a bite. They’re just that good!
Storage & Reheating Instructions
Alright, let’s talk about how to keep those scrumptious Red Velvet Blossom Cookies fresh and delicious! Proper storage is key to maintaining their soft, chewy goodness.
First up, once your cookies have cooled completely, grab an airtight container. Layer the cookies in there, and if you want to be extra careful, you can place a piece of parchment paper between each layer to prevent them from sticking together. This little trick helps keep them soft and fresh for about a week at room temperature. Trust me, they won’t last that long if you’ve got cookie lovers around!
If you want to store them for an even longer period, you can pop them in the fridge. Just remember to let them come back to room temperature before you dig in—nothing beats a cookie that’s soft and warm!
Now, if you find yourself with a few leftover cookies (which is a miracle!), you can also freeze them! Just place them in a freezer-safe bag or container. They’ll stay lovely in the freezer for up to three months. When you’re ready to enjoy a cookie, simply take one out and let it thaw at room temperature for about 15-20 minutes. For a little extra warmth, you can pop it in the microwave for about 10-15 seconds. Just be careful not to overdo it, or you might end up with a gooey mess instead of a warm, chewy treat!
With these storage tips, you can always have a delightful Red Velvet Blossom Cookie ready to satisfy your sweet tooth whenever you want! Happy snacking!
Print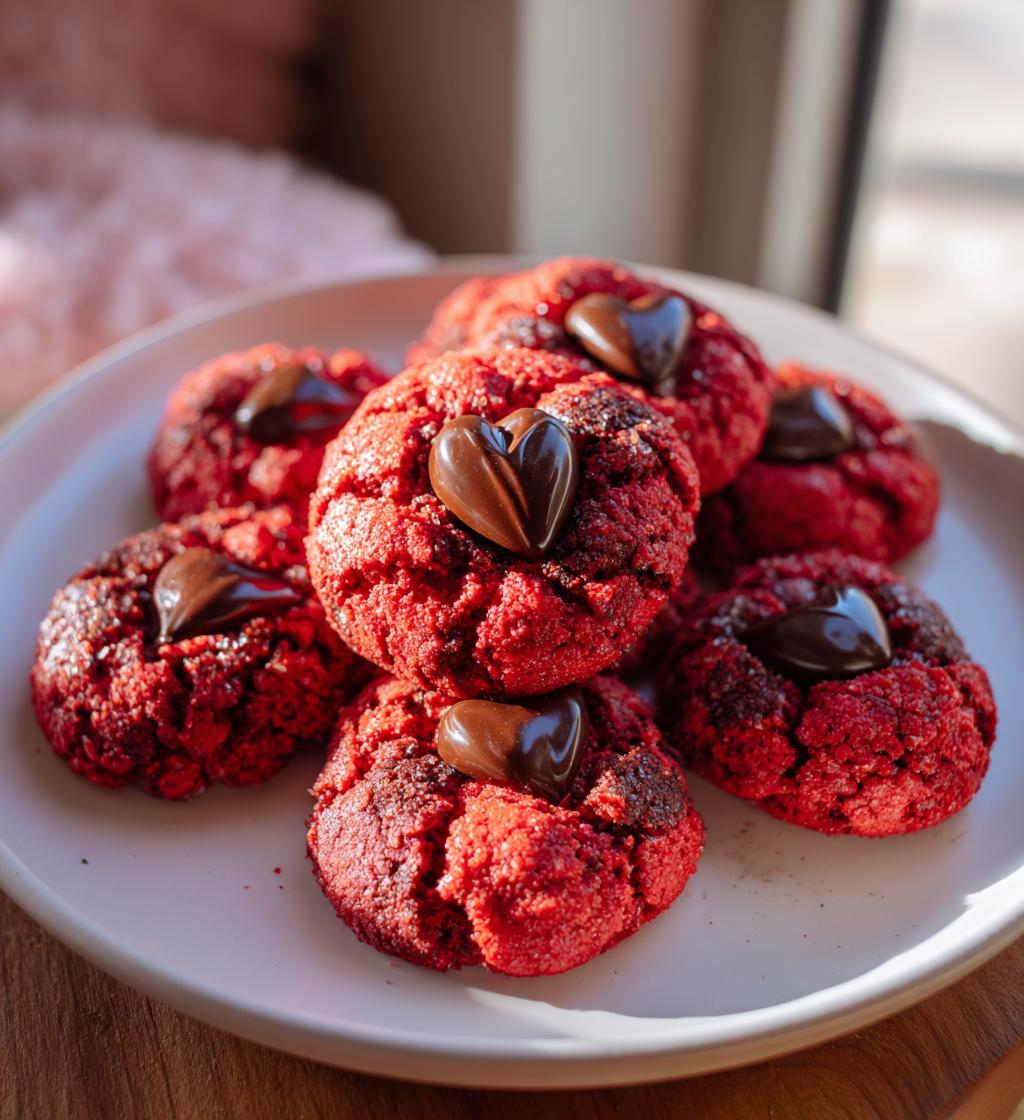

Red Velvet Blossom Cookies: 7 Steps to Cookie Bliss
- Total Time: 27 minutes
- Yield: 24 cookies 1x
- Diet: Vegetarian
Description
Delicious and colorful red velvet cookies with a soft texture.
Ingredients
- 2 cups all-purpose flour
- 1 tablespoon cocoa powder
- 1 teaspoon baking soda
- 1/2 teaspoon salt
- 1 cup unsalted butter, softened
- 1 cup sugar
- 1/2 cup brown sugar
- 1 large egg
- 1 tablespoon red food coloring
- 1 teaspoon vanilla extract
- 1 cup white chocolate chips
Instructions
- Preheat your oven to 350°F (175°C).
- In a bowl, mix flour, cocoa powder, baking soda, and salt.
- In another bowl, cream butter, sugar, and brown sugar until fluffy.
- Add egg, food coloring, and vanilla extract. Mix well.
- Gradually add dry ingredients to the wet mixture. Stir until combined.
- Fold in white chocolate chips.
- Drop spoonfuls of dough onto a baking sheet.
- Bake for 10-12 minutes or until edges are set.
- Let cool on the baking sheet for a few minutes before transferring to a wire rack.
Notes
- Store cookies in an airtight container.
- Use gel food coloring for a brighter color.
- Chill the dough for 30 minutes for thicker cookies.
- Prep Time: 15 minutes
- Cook Time: 12 minutes
- Category: Dessert
- Method: Baking
- Cuisine: American
Nutrition
- Serving Size: 1 cookie
- Calories: 150
- Sugar: 10g
- Sodium: 100mg
- Fat: 7g
- Saturated Fat: 4g
- Unsaturated Fat: 2g
- Trans Fat: 0g
- Carbohydrates: 20g
- Fiber: 1g
- Protein: 1g
- Cholesterol: 30mg
Keywords: Red Velvet Blossom Cookies


