

Peek-a-Boo Cake: 5 Colorful Layers to Wow Everyone
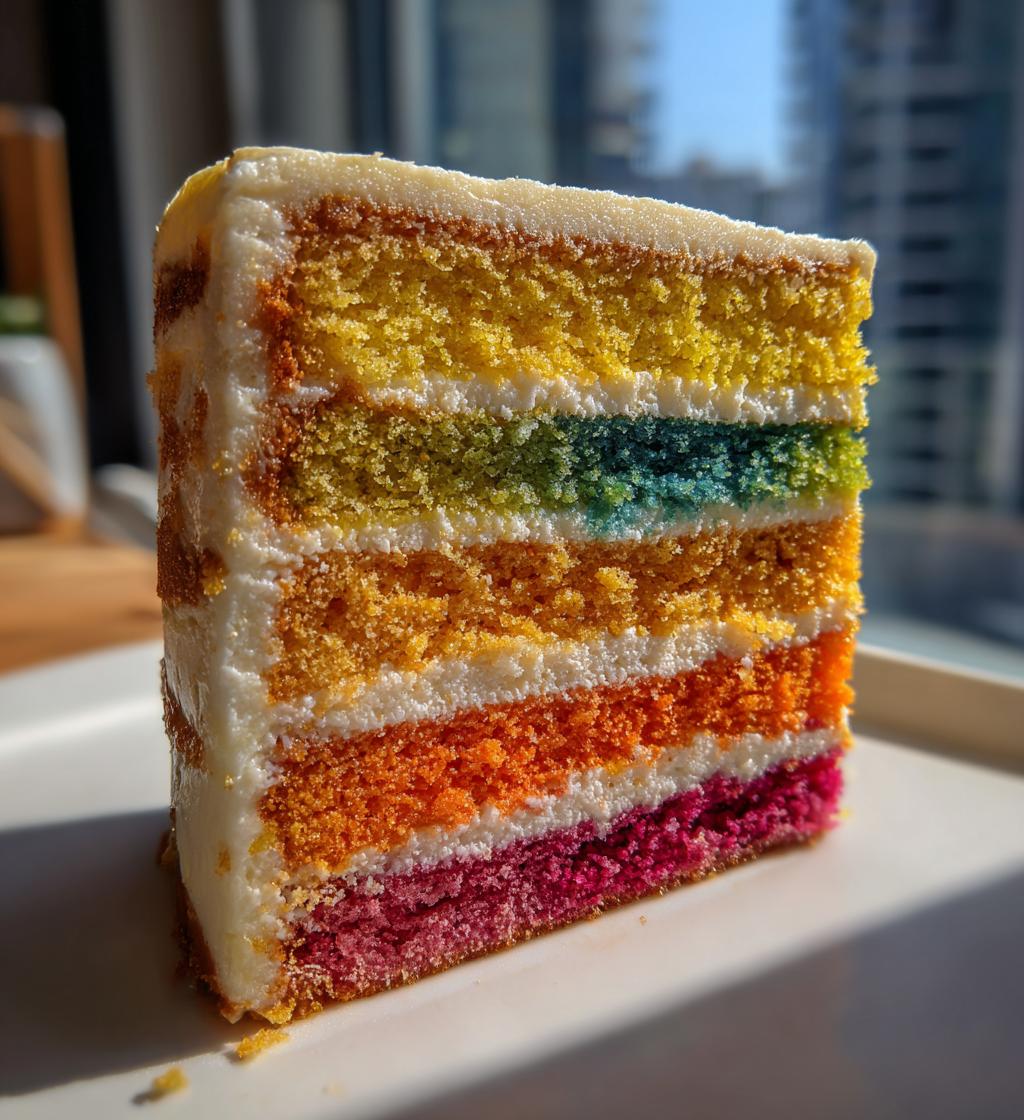
Oh my goodness, have you ever seen a cake that’s just bursting with color and surprises? That’s exactly what my Peek-a-Boo Cake is all about! Imagine slicing into a beautifully frosted cake, only to reveal vibrant layers of color hidden inside. It’s like a party in every slice! This cake is my go-to for celebrations because it never fails to bring smiles and wow moments. Whether it’s a birthday, a baby shower, or just a fun weekend treat, this cake is always the star of the show. Trust me, once you bring this beauty to the table, everyone will be asking for the recipe. Plus, it’s so fun to make! Get ready to impress your friends and family with this delightful treat!
Ingredients List
Alright, let’s get down to the fun part—gathering the ingredients for this spectacular Peek-a-Boo Cake! You’ll want everything fresh and ready to go. Here’s what you need:
- 2 cups all-purpose flour, sifted
- 1 ½ cups granulated sugar
- 1 cup unsalted butter, softened at room temperature
- 4 large eggs, at room temperature
- 1 cup milk, whole or 2% works best
- 1 tablespoon baking powder
- 1 teaspoon vanilla extract
- Food coloring (various colors to make it pop!)
- 2 cups buttercream frosting, homemade or store-bought
Make sure to have everything measured out before you start mixing—it makes the process so much smoother! And don’t skimp on the food coloring; the more vibrant, the better! Let’s make it eye-catching!
How to Prepare the Peek-a-Boo Cake
Now that we’ve got our ingredients in order, let’s dive into the preparation of this colorful masterpiece! Don’t worry, I’ll walk you through every step so you can make this cake with confidence. Just follow along, and soon you’ll have a gorgeous Peek-a-Boo Cake ready to impress!
Step-by-Step Instructions
- First things first, preheat your oven to 350°F (175°C). This is super important because you want your cake to bake evenly from the moment it goes in.
- While that’s heating up, grab your two round cake pans and grease them with butter or cooking spray, then dust them with a little flour. This will help your cakes come out easily once they’re baked!
- In a large mixing bowl, cream together the softened butter and granulated sugar until it’s light and fluffy. This usually takes about 3-4 minutes. Trust me, this step is key to a tender cake!
- Next, add in your eggs, milk, and vanilla extract. Mix everything together until you have a smooth batter. It should smell heavenly by now!
- In another bowl, whisk together the sifted all-purpose flour and baking powder. This ensures your cake rises beautifully and has a lovely texture.
- Now it’s time to combine the wet and dry ingredients. Gradually add the flour mixture to the butter mixture, mixing just until everything is well combined. Don’t overmix—you want to keep that light texture!
- Here comes the fun part! Divide the batter into several bowls, depending on how many colors you want to use. Add your food coloring to each bowl and mix until you achieve the vibrant shades you desire. Go bold, and don’t be shy with the color!
- With your colored batters ready, it’s time to layer them. Spoon the different colored batters into the prepared cake pans, layering them as you go. You can create fun patterns or just alternate colors—totally up to you!
- Pop those pans into the oven and bake for about 25-30 minutes. You’ll know they’re done when a toothpick inserted in the center comes out clean. Just be careful not to open the oven too often, or they might not rise properly!
- Once baked, take them out and let them cool in the pans for about 10 minutes. Then carefully transfer the cakes to a wire rack to cool completely. This step is crucial because you don’t want to frost a warm cake—it’ll melt your frosting!
- Once cooled, it’s time to stack those layers! Place one cake layer on a serving plate, spread a generous layer of buttercream frosting on top, and then add the second layer. Frost the top and sides of the cake until it’s beautifully covered.
And there you have it! Your Peek-a-Boo Cake is ready to shine! Just step back and admire your work before slicing into it—trust me, the reactions will be priceless!
Why You’ll Love This Recipe
Oh, let me tell you why the Peek-a-Boo Cake is just the best! First off, it’s absolutely perfect for celebrations. Whether it’s a birthday party or a festive holiday gathering, this cake never fails to wow the crowd. It’s like a little surprise waiting to be discovered, and who doesn’t love that?
And you know what? It’s not just a treat for the taste buds; it’s also a feast for the eyes! The vibrant colors make it fun for kids (and adults too, let’s be honest!). You can let your creativity run wild with the colors, making each cake unique and personal. Trust me, the joy of seeing those bright layers is just unmatched!
Plus, it’s delicious! The buttercream frosting is the cherry on top—or should I say the icing on the cake? It pairs perfectly with the soft, fluffy layers, creating a slice that’s rich and satisfying. You won’t just be serving cake; you’ll be serving smiles and happiness every time!
Seriously, once you make this Peek-a-Boo Cake, it’ll become your go-to for any occasion. It’s fun, colorful, and so incredibly tasty! What’s not to love?
Tips for Success
Alright, let’s make sure your Peek-a-Boo Cake turns out absolutely spectacular! Here are my top tips to help you achieve the best results and impress everyone:
- Go for Gel Food Coloring: If you want those colors to really pop, use gel food coloring instead of liquid. It’s more concentrated, so you won’t need as much to get those vibrant hues. Plus, it won’t change the consistency of your batter!
- Chill Before Slicing: After your cake is frosted, pop it in the fridge for about 30 minutes before slicing. This helps the frosting set up nicely and makes cutting cleaner. Trust me, you’ll be glad you did when those layers look perfect!
- Sprinkles Galore: Feel free to let your creativity shine when it comes to decorating! Add fun sprinkles on top of your frosted cake for that festive touch. It’s a small detail, but it makes a big impact and gives your cake that extra wow factor!
- Don’t Rush the Cooling: It might be tempting to frost your cake while it’s still warm, but resist that urge! Allow it to cool completely to avoid a melty mess. Patience is key here!
- Experiment with Layers: When layering your colors, don’t be afraid to mix it up! Use different patterns or even create a marble effect by swirling colors together for a unique look. It’s all about having fun in the kitchen!
With these tips in your back pocket, you’re all set to make a stunning Peek-a-Boo Cake that will have everyone talking. Happy baking!
Variations of the Peek-a-Boo Cake
Oh, the fun doesn’t stop with just one Peek-a-Boo Cake! There are so many creative variations you can try to keep things exciting. Let your imagination run wild and customize this cake to your heart’s content. Here are some ideas to get you started:
- Flavor Combinations: Why not switch up the flavors? Instead of the classic vanilla base, try adding some cocoa powder for a chocolatey twist! Or go fruity by incorporating lemon or orange zest into the batter for a refreshing citrus flavor. You can even blend in some almond extract for a nutty essence!
- Alternative Frosting Options: While buttercream is always a winner, you can experiment with other frostings too! Try cream cheese frosting for a tangy kick, or whip up a fluffy whipped cream topping for a lighter option. You could even go decadent with a chocolate ganache drizzle—yum!
- Seasonal Themes: Embrace the seasons by tailoring your colors and flavors! For fall, think warm tones like orange and brown, and maybe add some pumpkin spice to the batter. During the holidays, red and green layers with peppermint frosting can bring festive cheer to your gatherings. You could even make a pastel version for spring with light pinks and blues—perfect for Easter celebrations!
- Rainbow Surprise: Make a full rainbow Peek-a-Boo Cake by using the colors of the rainbow in layers. It’s a great way to celebrate Pride Month or just bring a burst of joy to any occasion. Each slice will be a delightful surprise!
- Mini Peek-a-Boo Cakes: If you’re feeling adventurous, try making mini versions of this cake! Use a muffin tin or small cake pans to create individual-sized Peek-a-Boo Cakes. They’re perfect for parties and make a cute presentation!
With these variations, you can create a Peek-a-Boo Cake that’s truly one-of-a-kind! Each version will bring its own special flair and flavor, so don’t hesitate to play around and make it your own. Happy baking and decorating!
Storage & Reheating Instructions
So, you’ve made this stunning Peek-a-Boo Cake, and now you’ve got some leftovers (if you can believe it!). No worries—storing it properly will keep it fresh and delicious for days to come!
First off, if you have any leftover slices, make sure to cover them well. I like to use plastic wrap or place them in an airtight container. This helps prevent the cake from drying out and keeps that fluffy texture intact. If you’ve got a whole cake left, you can lightly cover the top with plastic wrap or a cake dome to protect the frosting and layers.
Store your cake in the refrigerator if you want to keep it fresh for about 4-5 days. Just remember that the longer it sits, the more the frosting can soften. But trust me, even a few days later, it’ll still be a delightful treat!
Now, if you want to enjoy a slice after it’s been in the fridge, you can reheat it gently. I recommend using the microwave for this—just pop a slice on a microwave-safe plate, cover it with a damp paper towel, and heat it for about 10-15 seconds. This warms it up perfectly without making it too hot or drying it out. You could also let it sit at room temperature for about 30 minutes before digging in if you prefer it cold. Either way, it’s bound to be scrumptious!
If you want to keep your cake for longer, you can freeze it! Just wrap individual slices tightly in plastic wrap, then place them in a zip-top freezer bag. They’ll last for up to 2 months in the freezer. When you’re ready to enjoy, simply thaw it in the fridge overnight or let it sit at room temperature for a bit. It’ll taste just as good as the day you baked it!
With these storage and reheating tips, you’ll have delicious Peek-a-Boo Cake ready to enjoy whenever the craving strikes. Happy indulging!
Nutritional Information
Now, let’s talk about the nutritional side of things for our fabulous Peek-a-Boo Cake! While I believe that enjoying a slice of cake is all about the joy it brings, it’s still helpful to know what you’re indulging in. Here are the estimated nutritional values per slice:
- Calories: 350
- Fat: 15g
- Saturated Fat: 9g
- Unsaturated Fat: 3g
- Trans Fat: 0g
- Cholesterol: 70mg
- Sodium: 200mg
- Carbohydrates: 50g
- Fiber: 1g
- Sugar: 28g
- Protein: 4g
Keep in mind, these values are estimates and can vary based on the specific ingredients you use, especially if you decide to switch up the frosting or add any extra goodies. But hey, isn’t a slice of this delightful cake worth every bite? Enjoy every moment of your baking and indulging!
FAQ Section
Can I use a different type of frosting?
Absolutely! While buttercream is a classic choice, you can definitely switch it up. Cream cheese frosting adds a nice tang, or you could go for a whipped cream topping for something lighter. Get creative and find what you love!
What if I don’t have round cake pans?
No worries! You can use square pans or even a bundt pan if that’s what you have on hand. Just adjust the baking time a bit since different shapes can affect how quickly the cake cooks through.
Can I make this cake ahead of time?
Yes! You can bake the cake layers a day in advance and store them wrapped in plastic wrap in the fridge. Just frost it the day you plan to serve it for the best texture and presentation.
How do I store leftover Peek-a-Boo Cake?
Store any leftover cake in an airtight container in the fridge for about 4-5 days. If you want to keep it longer, wrap slices tightly in plastic wrap and freeze them for up to 2 months. Just thaw in the fridge when you’re ready to enjoy!
Can I use different colors of food coloring?
Definitely! Feel free to use any colors you like. Gel food coloring works best for vibrant shades, but liquid coloring is fine too—just remember to adjust the amount to get the desired brightness. Have fun with it!

Peek-a-Boo Cake: 5 Colorful Layers to Wow Everyone
- Total Time: 1 hour
- Yield: 12 servings 1x
- Diet: Vegetarian
Description
A fun and colorful cake that surprises with hidden layers.
Ingredients
- 2 cups all-purpose flour
- 1 ½ cups granulated sugar
- 1 cup unsalted butter, softened
- 4 large eggs
- 1 cup milk
- 1 tablespoon baking powder
- 1 teaspoon vanilla extract
- Food coloring (various colors)
- 2 cups buttercream frosting
Instructions
- Preheat your oven to 350°F (175°C).
- Grease and flour two round cake pans.
- In a large bowl, cream together butter and sugar.
- Add eggs, milk, and vanilla. Mix until smooth.
- In a separate bowl, combine flour and baking powder.
- Gradually add dry ingredients to wet ingredients. Mix until combined.
- Divide batter into multiple bowls and add food coloring to each.
- Spoon colored batter into cake pans in layers.
- Bake for 25-30 minutes or until a toothpick comes out clean.
- Let cakes cool before frosting.
- Stack cakes with buttercream frosting between layers.
- Frost the top and sides of the cake.
Notes
- Use gel food coloring for brighter colors.
- Chill the cake before serving for better slicing.
- Decorate with sprinkles for a festive touch.
- Prep Time: 30 minutes
- Cook Time: 30 minutes
- Category: Dessert
- Method: Baking
- Cuisine: American
Nutrition
- Serving Size: 1 slice
- Calories: 350
- Sugar: 28g
- Sodium: 200mg
- Fat: 15g
- Saturated Fat: 9g
- Unsaturated Fat: 3g
- Trans Fat: 0g
- Carbohydrates: 50g
- Fiber: 1g
- Protein: 4g
- Cholesterol: 70mg
Keywords: Peek-a-Boo Cake, colorful cake, fun cake, hidden layers


